
Even With A Balcony Or A Small Patio, It’s Easier Than You Think To Start Growing Vegetables, Herbs And Fruit – Plus You Can Save Hundreds
Urban homes increasingly don’t have gardens, but many do have a small outside space such as a balcony, patio, or concrete front yard with space for some containers. The exciting thing that people all over the world are discovering is that it’s possible to create meaningful gardens in these spaces – and to use them to produce a surprising amount of food. I grew $1500 worth of fruit, veg and herbs on a small balcony and windowsills in just my second year of growing.
Once you have a green oasis on your doorstep, you can enjoy the beauty of plants every day, watch the bees and birds that visit, and pick fresh ingredients such as herbs to add flavour to most of your meals. It can feel like a miracle.
The key thing that determines what you can grow in your space are the hours of sun it receives each day. Fruiting vegetables such as tomatoes and chillies grow very happily in containers but they do need at least six hours of sun.
However, if your space is shady, and you only get three or four hours of sun a day, there is still lots you can grow – including salads, leafy vegetables, woodland fruits such as blackberries and blueberries, and most herbs (even the supposedly sun-loving ones). A full guide on how much sun different crops need can be found in my book (visit my website).

Success in gardening is never guaranteed – so don’t worry if everything doesn’t work out first time. However, if you follow my advice – particularly about good quality compost, sun, and daily attention – your chances of success will be high. Once you’ve made a start, there are literally hundreds of wonderful edible plants you can grow in containers.
Excellent choices include heritage tomatoes, chillies, all the herbs (chives, oregano, and Scots lovage are among our favourites), French and runner beans, kale and chard, and fruits including apples, blueberries, and even Chilean guavas.
It’s easy to feel you should go out and buy a lot of new kit before you can start growing. But you don’t need much to get started and the best way to learn is simply to give it a go with an enquiring and open mind.
Many people find much joy and fulfilment in growing in a small space at home. I hope you will too.
A daily routine

Plants in containers hate drying out. The key is to start a daily routine to check if plants need watering. With the right mindset, this can be a lovely way to start or end the day and only takes a few minutes.
Put your finger an inch down in the soil – it needs to feel damp like a wrung-out flannel. Most plants in containers need watering every day, particularly in warm or windy conditions.
Plants in containers also need regular feeding for optimum growth. This is a big subject, but feeding with liquid seaweed fertiliser once a week will make a big difference. Simply add a teaspoon to your watering can once a week.
Feeding tips for healthy plants

Learning to feed plants, as with much of growing, is trial and error combined with observation and not worrying if things go a bit wrong. Here are some tips to help you:
- Shoots, roots and fruits is a useful mnemonic for remembering the roles of N, P and K in the plant. This diagram also lists some common fertilisers that are high in each element.
- Balanced feeds contain roughly equal proportions of NPK (for example, blood, fish and bone).
- Like us, plants benefit from a diverse, balanced diet. Try to use a variety of feeds – as many as you easily can.
- Plants in containers also seem to do best with a combination of feeds in the soil (such as worm compost or chicken manure pellets); a regular root drench with a good quality liquid feed such as liquid seaweed or nettle tea, and regular foliar feeding with liquid seaweed or similar.
- While it’s definitely not essential to do all three, I’ve found my plants usually look the healthiest when I do.
- Try to use feeds based on natural ingredients, such as seaweed, rapeseed meal or chicken manure as much as you can. That said, don’t feel you need to dismiss good-quality artificial fertilisers and controlled release fertilisers. They can still be useful, particularly if you can’t find natural fertilisers or don’t have the time to make them.
- Think about what a plant needs and when it needs it. Fruiting plants will benefit from feeds high in potassium and leafy crops from feeds high in nitrogen. Plants that are growing strongly or fruiting heavily will need more feed than those that aren’t.
- Little and often works well. Professional growers often use liquid feeds (such as tomato feed) every time they water, but in a more dilute concentration (the overall amount of feed per week remains the same). I often make up a mix of different liquid feeds (homemade and bought) in a bucket and add a very small amount every time I water.
Safety and plastic

Most plastics are generally considered safe to grow in. These include:
- Polyethylene Terephthalate (PET or PETE) – Code 1
- High-Density Polyethylene (HDPE) – Code 2
- Low-Density Polyethylene (LDPE) – Code 4
- Polypropylene (PP) – Code 5
You can tell the type of plastic by the code number and abbreviation stamped on the bottom (this isn’t mandatory in the UK, but most plastics are marked).
It’s a complicated issue because there are many different types of plastic. Also, even when chemicals are leached into the soil, some quickly break down into harmless compounds and others aren’t absorbed by the plant.
Best advice, at the time of writing, is to choose food-safe plastics to grow in.
Six plants to start in pots now
You will need: compost – it’s important to use a good quality, peat-free and multipurpose compost, such as Sylvagrow; liquid seaweed fertiliser; watering can with a fine spray, i.e. small holes in its rose; and pots.
You can buy attractive pots of your choice, but you can also use recycled containers such as old buckets, bags for life or supermarket veg crates. Make drainage holes if needed or, if the crate is already full of holes, line with newspaper to stop compost falling out. Size does make a difference – larger pots are generally easier to grow in.
Pea shoots

Pea shoots are quick and easy to grow. Fill a tray with compost, leaving about a ½in gap at the top. Spread dried peas across the surface so they are almost (but not quite) touching. Cover with a thin layer of compost and water well. Shoots are ready to eat when 2-3in tall – cut them off with scissors. Usually this takes two or three weeks. As shoots grow larger, keep well-watered or they will become tough.
You will need:
- 2-3 hours sun
- A seed tray lined with paper
- Dried marrowfat peas (from supermarkets and health food shops)
Mint
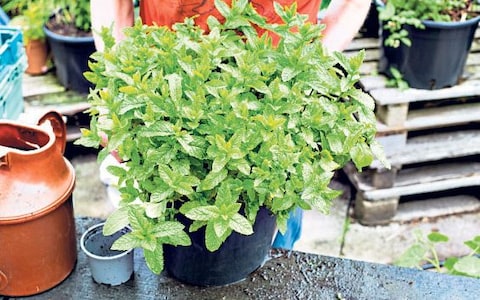
Supermarket herbs don’t live long because the pot is too small. But move one into a larger pot, split and repot it every year, and it can last you a lifetime. First, part-fill the larger pot with compost and water. Then, carefully remove the mint plant from its pot and move it into the large pot. Fill round the sides with compost and lightly firm it down so the plant is firmly supported. Water well again.
You will need:
- 3+ hours sun
- 3-10 litre pot (bucket-sized is perfect)
- Supermarket mint plant
Nasturtiums
Nasturtium seeds such as ‘Blue Pepe’ are the perfect plant for small spaces – they are pretty, and both the flowers and young leaves make an attractive and delicious addition to salads. Fill the pot with compost and water well. Sow the seeds 3in apart, ½in deep.

You will need:
- 4+ hours sun
- 3-5 litre pot
- Nasturtium seeds
Rocket
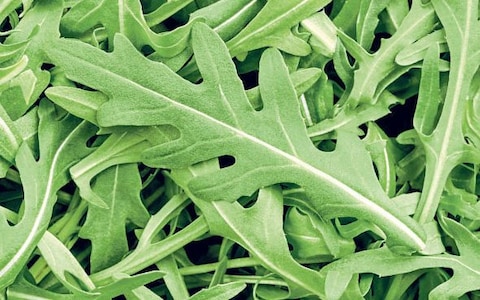
Salads grow fast and it’s possible to be self-sufficient with just a few pots. Fill a container with compost and water well. Sow seeds 1in apart, cover with a thin layer of compost (about the thickness of two seeds), and lightly firm down. As the rocket grows, remove (and eat) some plants until there is 4-6in between plants. Then pick the outer leaves. Sow again in early September for leaves all winter.
You will need:
- 4+ hours sun
- A window box or an old supermarket veg crate
- Rocket seeds
Blackberries
Blackberries are easy to grow, very productive once established, and it’s lovely to have fresh berries on your doorstep in July (if you choose an early ripening variety such as ‘Loch Tay’). The bees will enjoy the blossom, too. One plant won’t produce much, if any, fruit in its first year, but once established it will give you a good crop every year.

You will need:
- 4+ hours sun
- 40-50 litre pot
- A thornless blackberry plant
- Canes for support
Potatoes
Potatoes are fun to grow. First early seed potatoes are ready in just 10-12 weeks and are the best choice for containers. Put about 4in of compost in the pot, and then one or two spuds depending on size of pot. Cover with 6in of compost and water well. When the plant gets about 8-10in tall, add a fresh layer of compost every couple of weeks to cover the lower leaves. Stop an inch or two from the top of the pot.
You will need:
- 5+ hours sun (i.e. half a day)
- Bucket-sized container or old bag for life
- First early seed potatoes


